Tuesday, April 12, 2011

Tales of Costumes PAAAAST!: Suki from Avatar the Last Air Bender.

So I used to cosplay. Yes, to those mundane friends of mine who found this blog via Facebook, I was one of THOSE people. I was one of the ridiculous folk who dressed up as imaginary characters at conventions. Trust me, this IS as weird as it sounds when you've never been exposed to that universe. Hell, I wasn't really fully exposed to that universe until I turned 25. So imagine my surprise at the notion that it even existed!
In my defence, I have to say that cosplay was really a fantastic way for me to learn how to sew. And that's pretty much what it was; fodder for me to get my feet with with ye olde sewing machine. I had some epic failures in cosplay *cough* which I rather not put on view here at the moment. But get me drunk one night and I may post the "What was a thinking!? Seriously!?" entry just to remind myself that, well, I HAVE improved over time.
But that is for another day.
...and another bottle of tequila.
And luckily for me, every misstep also led to a learning experience and a project that turned out even better than my expectations could lead. Over the years my interest has waned from cosplay and into more historical recreation.(You can thank the SCA for that one). I tend to take more delight these days in creating my own designs. But that doesn't mean that I don't admire a good chunk of cosplayers out there that have technical skill out the Yin Yang! Trust me, there are tons...I'm looking at YOU, Besty.
I only dabbled a bit.
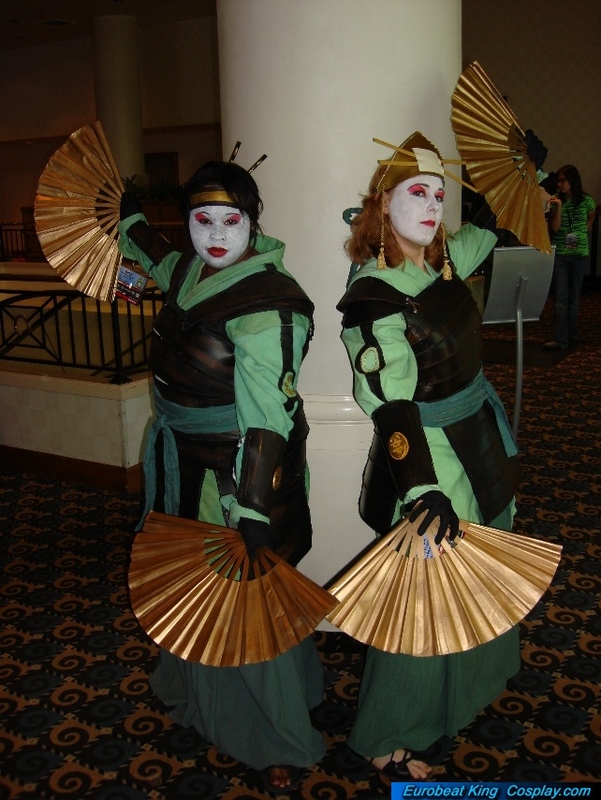
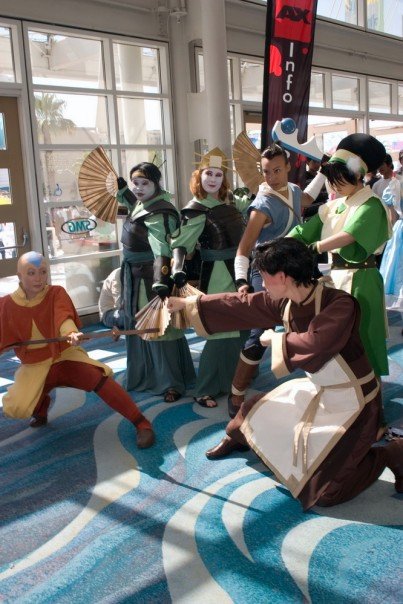
Suki from Avatar: The Last Air Bender cartoon is definitely one of my better cosplay adventures.  This was done back in 2007-ish at Anime Expo. Trishana, my partner in crime in the above photo, was the one who came up with the idea of doing this cosplay.  She was a huge fan of Avatar. I was just starting to get into the show. Honestly, even though I loved the show, The main reason I did this costume was because I REALLY wanted to build the armor.


Ah, my old apartment...
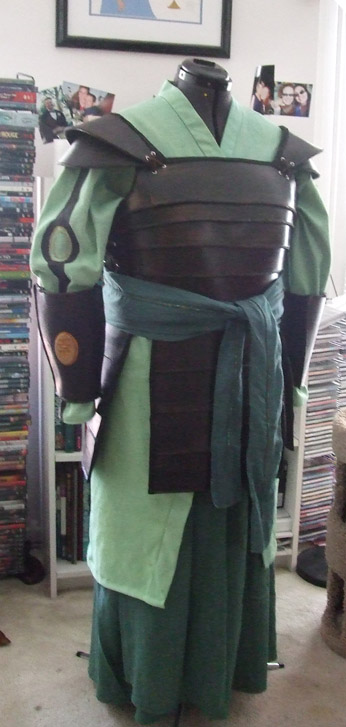
Anyways, the armor and wrist guards are made of craft foam. No fooling. There's an amazing tutorial online RIGHT here that gives you step by step instructions on how to do this. I pretty much followed it to the letter. the breast plate slats are sewn/glued onto a muslin base I built. Pretty much the same with the wrist guards. The medallion is sculpty.

Believe it or now, we dyed the fabrics all on our own. Definitely came out better than previous adventures into dye. In retrospect, I wish I documented my progress on this costume since I learned so many new techniques. Unfortunately I was so swept up with working on it, I didn't bother to take my camera out for this. Regardless,  it was an adventure making the Suki costume.
One that didn't end in tears and bottles of tequila, either.
Baby Steps.
Monday, April 11, 2011

Persian Coat from Reconstructing History Pattern

And now, a break from something truly amazing to look at my crap again. ;)

Here's the finished Persian coat I made from a Reconstructing History pattern. Overall its a nice pattern. My only warning would be to size UP when you're selecting your pattern size. The pattern that was made for my measurements turned out to be too small so I had to jump to the next size which fit much better. Other than that, this pattern is relatively simple. I have yet to make the other garments from the pattern though. Its on the ever growing list of projects
Note the gorilla sleeves. The wrists are tapered tightly so I can smoosh the sleeves up onto my arms, which I was told is a period fit for a coat like this. judging by the research I've seen, I'd say that's pretty accurate.


The fabric came from Home Fabrics which was closing its doors and had a HUGE sale. I believe this cotton was originally around $7 a yard. I got it for $2 a yard. TOTAL STEAL! But even though its cotton, its extremely heavy. I've pretty much regulated this to a outdoor coat. It came in handy during the very chilly Estrella War this year. The buttons I picked up at Estrella. The button hole technique was taught to me by Baroness Briana Je Nell which is a FAR more elegant manner to do button loops than the way I've been doing them. I really should document a step by step for it soon...because its a great technique.

I'd have to say my favorite part of the coat are the gores on the side. It give the whole garment fantastic movement, especially for belly dancing in cold weather.
I think next time I try this pattern out again I'll try it in a silk. I also am hoping to try my hand at the full outfit. Overall though its a useful coat, especially for someone who gets cold at the drop of a hat.

Also, my Regina Black costume overall is more or less done finally. Pictures to come soon!

Saturday, April 9, 2011

Pulp Fashion: The Art of Isabelle de Borchgrave

I'm taking a quick break from posting about my antics to point out this amazing exhibition happening the the Legion of Honor Fine Art Museum in San Francisco.
Isabelle de Borchgrave has worked with several costume historians to recreate period garments....out of paper.
You can find information on the exhibition here.
You can also find detailed pictures of the exhibition at the T-Lo Blog.

I can honestly say that the photos are truly breath taking. I REALLY hope I can make a quick trek up to my home turf to see this.

This exhibition will be running until June 5th 2011 at the Legion of Honor Fine Art Museum in San Fransisco.

If anyone gets the opportunity to see this, please let me know what you thought!

Friday, April 1, 2011

The Beginings of Regency Morning Gown

It starts.
Yes, I have started YET another new historical garment.  But this one is actually un SCA related. Who knew? I picked up a pattern from Reconstructing History. Its not bad  but keep in mind it seems to need a lot of tweaking to get it to fit properly. The sizing is a bit wonky in places, mainly the sleeves and arm syes. I had to tweak the pattern to make it lay right.  Luckily I bought plenty of fabric to use for a mock up and a finished piece.

Here is the mock up version I did. Behold! Sleeve-zilla! Yeah,I wasn't too fond of the sleeves there. I was going to do the long sleeve version at first but it just wasn't doing it for me. And the short sleeve/over sleeve was huge. More of a three quarter sleeve. Not overly thrilled with how sad it looked.

 And here is the current version after I narrowed the arm sye and widened the shoulder strap. Overall, a MUCH better fit. The sleeves were cut down considerably.  They hit just above the elbows now with a bit of a poof. MUCH happier sleeves.


The dress is a bib font style so a stomacher will be going over the front of the bodice. I was screwing around a bit with lace trim to see what I can do with it. I'm a ample bosumed gal, to put it lightly, so the stomacher is a titch too small. Nothing that can't be tweaked.

Roughly, its going to fit like this when its done. The skirt will be next. I'm also considering making a chemise to go under it, but I'm not completely sold yet.

A close up of the fabric I'm using. Just a regular cotton print from JoAnn Fabrics. I usually tend to avoid white when possible since it washes me out, but the print was adorable and the white was so warm that I went for it. I want to try to make this dress pretty feminine.

Hopefully my next post will have the skirt attached!

Wednesday, February 23, 2011

Finished Gift Persian

As usual... I got busy. Erf.
But I did snap a couple of pictures of the Persian Coat I made as a gift for my friend, Ty.

Tah Dah!

Click to Enlarge
Unfortunately, my real camera's battery was dead, so I had to use my Camera phone. This was made from the Folk Wear pattern for Persian coats. I just received the Persian pattern from Reconstructing History though and build a quicky out of it. Much easier, more historically accurate, and flattering pattern for sure (not that my friend Ty doesn't look great. That woman can wear a burlap sack and still be gorgeous *jealous*). I'll post pictures of my Persian experiment soon.
And the hubby requested a new Coat for Court. Going to try my hand yet again at some Men's garb.

Also, I picked up a pattern for a Regency Morning Gown which I an very stoked to start work on.
So much to sew! So little time!

Tuesday, January 11, 2011

Iiiits Persian Time!

Gift Persian Coat is GO!

Another project I did over the Holidays. Here is a Persian coat I did as a Christmas gift for my friend Ty. It's finished, but I still need to take photos of her in it. I'm hoping to get a couple pics of her in it soon.

I didn't use a super authentic pattern for this. I used one from Folkwear. But it works! Ty's main garb consists of mostly of Persian and Middle Eastern style garb. Its perfect for fighting and equestrian. The fabric is leftover linen from my Viking apron I made last year. I wanted to make the coat machine washable so Ty could wear it not to just tourneys and court but for all her equestrian events as well. Gotta look good on that horse!

The trim I had for years. I picked this up in LA after I designed a production of Aladdin. This was the trim I used on Jafar's robe. I loved it so much I bought some for myself. It sat forever in my stash until this Christmas. The red and the purple work great together! That trim was a bitch to put on lemme tell ya.

I wanted to at least give the coat a bit of a period feel so I tried to find a contrasting color to line the coat. Persian coats usually were lined in fabric that was a contrasting color to the main fabric (Orange to Blue, Red to Green, etc etc..) But I'm pretty sure Ty isn't a huge yellow fan. So I opted for green. I figured there was so much red in the purple and yellow in that green that it would work. I think it looks pretty spiff. Its also Ty's wedding colors so a little added bonus there. That green cotton had been sitting in my stash since 2002. It was great to finally find something to use it for.
So there we go. Hopefully I can snap some photos of Ty in her new duds soon to post!

Saturday, January 8, 2011

Happy New Year-Blue Ren Details AND Future Projects Ahoy!


Just in time for 12th Night...again!

Okay, Maybe not JUST in time actually. I finished this back in December but didn't have a chance to post photos since I've been crazy busy with the holidays. The Blue Ren was both me screwing around to make some more court garb as well as put a lil somethin' somethin' up for Calafian Winter Arts. I ended up getting some fine trinkets for the dress. Honestly, that's the main reason I enter Winter Arts...for the free baubles.
I'm part raccoon.

Anyways. Here's some details on the sucker
.

So I went back on weight watchers recently and I ended up losing about...oh...5 pounds and a couple inches since I made this. needless to say It was a touch large for me compared to the rather perfect fit I originally had with it...not that I'm knocking the weight loss but damnit, I had that bust PERFECT before the diet.


Bodice detail...more or less. You still can't really see the beading I did on the trim. Feh.


You can see the beading a LITTLE better here. I was trying to go for subtle but honestly, next time I bead I think I'm going to make it a bit more bold so it reads better.

Side button closure again...Its flattering and I'm a one trick pony.

Detail of my orange sash with the tassels. Yup..Orange. I love me the orange.

The main reason I left the sleeves off this go around. I wanted to show off my first round with black work embroidery. I'm pretty happy with my first go around. So far, that leaf stitch is the only stitch I know. I'll need to hunt down some black work books soon to learn more. I'm hoping someday to to another chemise detailed with black work.

So that's it for the Blue Ren. Going to be taking a break from the Rens for a while *GASP*. I figured I made enough to get what I wanted to learn out of this pattern. Lined up a have a few fun things coming. SCA wise I need to make myself a couple of short (and quick) Persian coats to wear to Estrella war. It tends to be a muddy war and the calf length coats are perfect to wear in that weather. Hopefully i can slam out a couple soon.
I also plan to work on two big UBER projects which I want to document heavily. First off is the German Cranach gown. aka...one of these.

I bought a fantastic pattern of one from Reconstructing History and I've really been drying to try my hand at it. There are a LOT of techniques I'm going to have to learn to make it, but I'm willing and hopefully will have the resources to learn from.

My other project is a full Victorian bustle dress. A steampunk con is coming up in my neck of the woods around May and I wanted not only my zombie hunter costume but also a Victorian lady costume as well This picture is heavily influencing my design... especially the middle dress. I want to make the under garments and the dress. Its an ambitious project but one I've been wanting to do for years now. Honestly It has me a bit intimidated.


Wish Me Luck!