Tuesday, June 14, 2011

Hair Falls, Hair Clips, and RegencyGowns, Oh MY!

Anime Expo is fast approaching! And my friends and I tend to get a few tables together in the Artist Alley there. We go under the name ZOMGWTF?! Studios....long story behind that name. Its comprised of my other artist pals, Shing Khor, Trishana Prater, and Kythera of Anevern. And trust me when I say our styles and what we sell are VASTLY different between the four of us.
We like to keep people on their toes.
Anyways, every time the four of us get together for an event like this, I use it as an excuse to try my hand at doing something new. Last year I did a bunch of accessories for my Dollfie (...I really should take some photos of those). This year I decided to turn my attention to my interest in belly dancing and make some dancer style hair falls/hair clips. Well, okay that was my original idea. It ended up evolving slightly. As my brain is want to do for most projects I work on.
Take a peek! 

These are the hair falls/clips I originally started making.  A couple of these may turn into matching sets if I get my motivation springing again tonight.


And then I ended up finding these butterflies and kinda fell in love with them. So I made a couple sets of those as well in a similar style.

 
Did I mention I bought a LOT of butterflies? I ended up veering WAY off course from the hair fall style and ended up making these. I really like how these turned out. I'm considering making a few more simply because they are just fun to make...Need more butterflies though. Maybe some dragon flies if I can find some good ones.


And my one odd guy out here. I was going more for a Retro vintage style clip here. Might make a couple more of these just so I have some options.


And here is the result of the work I did while watching copious amounts of MST3K in my studio. These were a BLAST to make. It put me in a sort of zen state to slam out so many. I'm hoping I can sell a few. They will be available to buy in the Artist Alley during Anime Expo. We are in Row D...Not sure exactly what table number yet but I will let you know! Those that won't sell will be up on my Esty site right afterwards.


And since this is a costuming blog...
Regency progress! Keep in mind this is all just pinned together at the moment. Pins and sheer will are keeping that skirt on my dress form. I'm still tweaking this. As you can see I redid the stomacher. Since I don't have period stays (YET!) to wear under the dress I needed to rethink the stomacher to
 hide a bra. Alas, the stomacher looks great on the form but fits me really weird. So I'm going to have to bring a friend in to take a look at it to see where I'm going wrong. But at least I'm making progress!

Tuesday, May 10, 2011

Steampunk Photos!....Sorta

I went all the way to a Steampunk con and forgot to grab my camera.
Rather typical of me really.
So the only two photos I happen to have of the finished Regina Black costume. DRAT IT ALL!
The good news though is Colleen from WyngdLyon Creations and I are planning a photo shoot after May to get some decent shots of our work. I have a costume and she has a ton of beautiful stock to photograph to keep us busy.
Anyways...Here's the photos in all their blurry glory!

Yeah, blurry but not horrific!

It all turned out really well and I got a great response from people while wearing it. I'm hoping by the next go around that I'll finally do the glove I've been wanting to make.  As you can see, I decided to put the gun back into the picture.  I only got one side of it fully painted though so I ended up strapping the thing to my leg so you couldn't see the unfinished side. One thing I'm good at? Hiding the crap. This lead to me building a gun holster in an hour.

Detail shot!

The gun is a Nerf gun. Just the typical one you see modified by most Steampunk costumers. Eh, I like the shape even if I was being unoriginal. So the gun holster came out far better than I imagined it would. Its definitely very close to my original design since I wanted the gun to show. The holster part is actually cardboard with a bit of nylon trim around the top. I spray painted it copper then added the studs to it. It actually is Velcro-ed in the back so I can remove the gun when I wished.  I really didn't want to since it wasn't finished but its always nice to have an option! The cardboard is a bit flimsy so when I rebuild it, I'll probably use craft foam. For a day's use, it wasn't too bad. The chains are plastic and held it to my belt. I tied the rest of it around my thigh with a piece of braided hemp cord I made. Overall it was a lot more sturdy than advertised.
I cannot wait to get better shots of this costume!


On a less blurry photo note. I also got some fantastic photos of me in my dancing garb for the belly dancing performance I participated in at the con on Saturday! I couldn't have asked for a better photo!

We dubbed my hairstyle, sexual chicken... I had some vodka in me by then.

Unfortunately I don't know the photographer. So whoever you are Mr Photographer, thank you for the wonderful picture! If you see this, send me a link to your gallery and I'll post it! I do know that my friend Lilli took this fantastic picture of me and my hubby, Max who was dressed a la Morocco Mole. Thanks for the photo!

By the way, his vest was made by Colleen at WyngdLyon Creations. The link is posted in my links section. You should buy some of her amazing stuff...just sayin'.

Thanks for looking!


Wednesday, May 4, 2011

Steampunk Progress for Gaslight Gathering

I really need to stop taking photos with my camera phone. But I do it all the time. Mostly because I can't remember where I put my regular camera. Its somewhere in the house. I know THAT much.

The Gaslight Gathering is fast approaching! Its this Friday to be exact. I managed to get my long in overhaul steampunk costume (Regina "Reggie" Black) more or less to a finishing point. So if I venture on over on Friday, I'll have something to wear.

Goggles!


I considered buying welding goggles and rebuilding them all together. But honestly, I have been really happy with how my original goggles looked design wise. They pretty much look exactly like my drawing.  So I went back and fixed up all the broken bits then added on a few new pieces. The clock gears I think gives it more of a mechanised look than before. I still have to go in and clean up some bits but overall, they are done.


Coat and Vest!
  I amped up the distressing on the coat a LOT. I'm still half tempted to go in with some red paint and do a couple quick splatters on it, just to add some more grittiness. I decided to keep the blue shirt from the original since I look better in color. I added the watch chain and finally got the vial belt finished. Though I am considering going in and distressing the belt a bit more. I'm hoping to add a couple more hangy-offy thingys (Technical term. Honest) on the belt and coat just to give it more character. I do have a gun prop as well but I'm on the fence on if I want to use it since I'll need to build a holster for it.
I'll probably be wearing my old black slacks and my black goth-y looking boots to go with it. As much as I love my beautiful brown suede boots that are VERY steampunk, they hurt my knees if I'm in them for too long. Since I'll probably be on my feet all day, its probably best I go for comfort.
So its all the devil in the details from this point. I'll probably be playing around a bit more before I finally wear this sucker. Alas, I never got to my Victorian gown for this event but I DID manage to get some great patterns. It shall be in the works!

Hopefully I can get some photos of me in full costume soon!

Tuesday, April 12, 2011

Tales of Costumes PAAAAST!: Suki from Avatar the Last Air Bender.

So I used to cosplay. Yes, to those mundane friends of mine who found this blog via Facebook, I was one of THOSE people. I was one of the ridiculous folk who dressed up as imaginary characters at conventions. Trust me, this IS as weird as it sounds when you've never been exposed to that universe. Hell, I wasn't really fully exposed to that universe until I turned 25. So imagine my surprise at the notion that it even existed!
In my defence, I have to say that cosplay was really a fantastic way for me to learn how to sew. And that's pretty much what it was; fodder for me to get my feet with with ye olde sewing machine. I had some epic failures in cosplay *cough* which I rather not put on view here at the moment. But get me drunk one night and I may post the "What was a thinking!? Seriously!?" entry just to remind myself that, well, I HAVE improved over time.
But that is for another day.
...and another bottle of tequila.
And luckily for me, every misstep also led to a learning experience and a project that turned out even better than my expectations could lead. Over the years my interest has waned from cosplay and into more historical recreation.(You can thank the SCA for that one). I tend to take more delight these days in creating my own designs. But that doesn't mean that I don't admire a good chunk of cosplayers out there that have technical skill out the Yin Yang! Trust me, there are tons...I'm looking at YOU, Besty.
I only dabbled a bit.

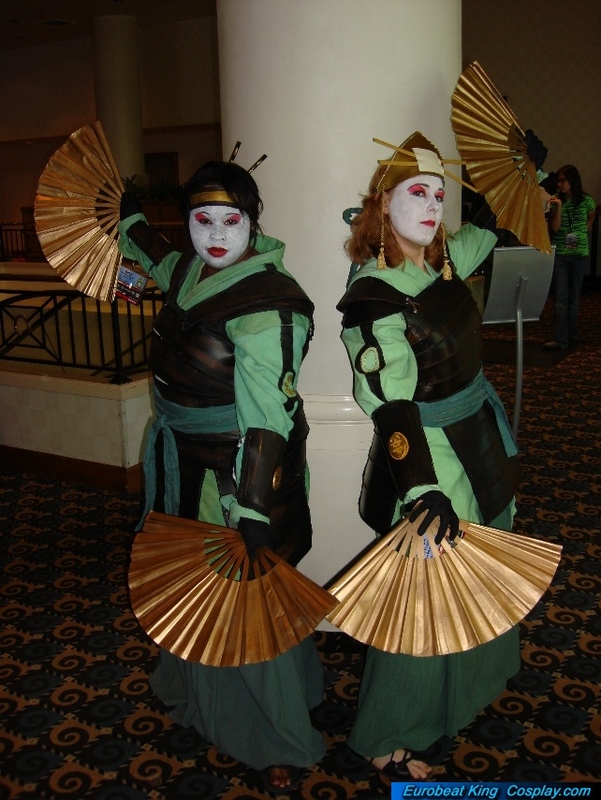
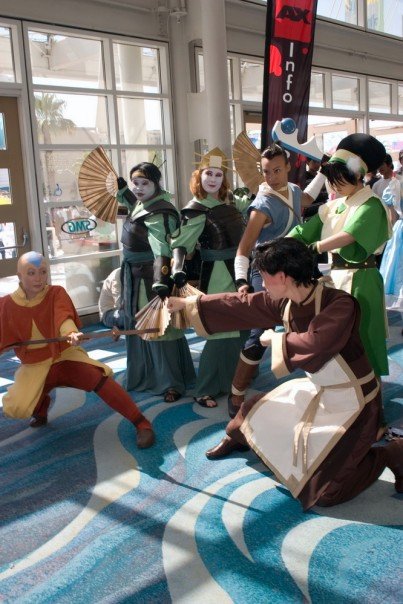
Suki from Avatar: The Last Air Bender cartoon is definitely one of my better cosplay adventures.  This was done back in 2007-ish at Anime Expo. Trishana, my partner in crime in the above photo, was the one who came up with the idea of doing this cosplay.  She was a huge fan of Avatar. I was just starting to get into the show. Honestly, even though I loved the show, The main reason I did this costume was because I REALLY wanted to build the armor.


Ah, my old apartment...
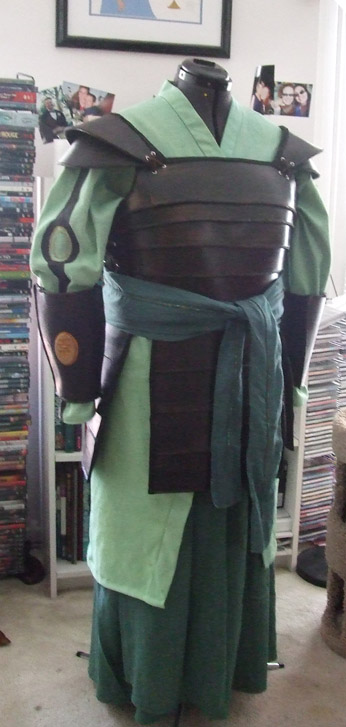
Anyways, the armor and wrist guards are made of craft foam. No fooling. There's an amazing tutorial online RIGHT here that gives you step by step instructions on how to do this. I pretty much followed it to the letter. the breast plate slats are sewn/glued onto a muslin base I built. Pretty much the same with the wrist guards. The medallion is sculpty.

Believe it or now, we dyed the fabrics all on our own. Definitely came out better than previous adventures into dye. In retrospect, I wish I documented my progress on this costume since I learned so many new techniques. Unfortunately I was so swept up with working on it, I didn't bother to take my camera out for this. Regardless,  it was an adventure making the Suki costume.
One that didn't end in tears and bottles of tequila, either.
Baby Steps.

Monday, April 11, 2011

Persian Coat from Reconstructing History Pattern

And now, a break from something truly amazing to look at my crap again. ;)

Here's the finished Persian coat I made from a Reconstructing History pattern. Overall its a nice pattern. My only warning would be to size UP when you're selecting your pattern size. The pattern that was made for my measurements turned out to be too small so I had to jump to the next size which fit much better. Other than that, this pattern is relatively simple. I have yet to make the other garments from the pattern though. Its on the ever growing list of projects
Note the gorilla sleeves. The wrists are tapered tightly so I can smoosh the sleeves up onto my arms, which I was told is a period fit for a coat like this. judging by the research I've seen, I'd say that's pretty accurate.


The fabric came from Home Fabrics which was closing its doors and had a HUGE sale. I believe this cotton was originally around $7 a yard. I got it for $2 a yard. TOTAL STEAL! But even though its cotton, its extremely heavy. I've pretty much regulated this to a outdoor coat. It came in handy during the very chilly Estrella War this year. The buttons I picked up at Estrella. The button hole technique was taught to me by Baroness Briana Je Nell which is a FAR more elegant manner to do button loops than the way I've been doing them. I really should document a step by step for it soon...because its a great technique.

I'd have to say my favorite part of the coat are the gores on the side. It give the whole garment fantastic movement, especially for belly dancing in cold weather.
I think next time I try this pattern out again I'll try it in a silk. I also am hoping to try my hand at the full outfit. Overall though its a useful coat, especially for someone who gets cold at the drop of a hat.

Also, my Regina Black costume overall is more or less done finally. Pictures to come soon!

Saturday, April 9, 2011

Pulp Fashion: The Art of Isabelle de Borchgrave

I'm taking a quick break from posting about my antics to point out this amazing exhibition happening the the Legion of Honor Fine Art Museum in San Francisco.
Isabelle de Borchgrave has worked with several costume historians to recreate period garments....out of paper.
You can find information on the exhibition here.
You can also find detailed pictures of the exhibition at the T-Lo Blog.

I can honestly say that the photos are truly breath taking. I REALLY hope I can make a quick trek up to my home turf to see this.

This exhibition will be running until June 5th 2011 at the Legion of Honor Fine Art Museum in San Fransisco.

If anyone gets the opportunity to see this, please let me know what you thought!

Friday, April 1, 2011

The Beginings of Regency Morning Gown

It starts.
Yes, I have started YET another new historical garment.  But this one is actually un SCA related. Who knew? I picked up a pattern from Reconstructing History. Its not bad  but keep in mind it seems to need a lot of tweaking to get it to fit properly. The sizing is a bit wonky in places, mainly the sleeves and arm syes. I had to tweak the pattern to make it lay right.  Luckily I bought plenty of fabric to use for a mock up and a finished piece.

Here is the mock up version I did. Behold! Sleeve-zilla! Yeah,I wasn't too fond of the sleeves there. I was going to do the long sleeve version at first but it just wasn't doing it for me. And the short sleeve/over sleeve was huge. More of a three quarter sleeve. Not overly thrilled with how sad it looked.

 And here is the current version after I narrowed the arm sye and widened the shoulder strap. Overall, a MUCH better fit. The sleeves were cut down considerably.  They hit just above the elbows now with a bit of a poof. MUCH happier sleeves.


The dress is a bib font style so a stomacher will be going over the front of the bodice. I was screwing around a bit with lace trim to see what I can do with it. I'm a ample bosumed gal, to put it lightly, so the stomacher is a titch too small. Nothing that can't be tweaked.

Roughly, its going to fit like this when its done. The skirt will be next. I'm also considering making a chemise to go under it, but I'm not completely sold yet.

A close up of the fabric I'm using. Just a regular cotton print from JoAnn Fabrics. I usually tend to avoid white when possible since it washes me out, but the print was adorable and the white was so warm that I went for it. I want to try to make this dress pretty feminine.

Hopefully my next post will have the skirt attached!